macOS Software Stack#
These instructions will walk you through installing the required software stack for PHYS 111. Before starting, ensure that your laptop meets the minimum requirements:
Runs macOS Catalina (10.15.x), macOS BigSur (11.4) or newer. macOS Monterey (12.x) is recommended; older operating systems are possible but not recommended unless there is no other choice.
Can connect to networks via a wireless connection
Has at least 25 GB disk space available
Has at least 4 GB of RAM (more is better, 8GB is recommended)
Uses a 64-bit CPU
Is at most 6 years old at the start of the program (4 years old or newer is recommended)
Student user has full administrative access to the computer
If your computer does not meet any of the requirements above, please don’t just drop the course!! Let me know first and we can discuss alternate possibilities so you can still take the course.
Tip
Before starting, I suggest updating your Mac to the latest version your laptop can run:
Installation notes#
If you have already installed Git, Latex, or any of the Python related packages please uninstall these and follow the instructions below to install and configure them correcty (make sure to also remove any user configuration files and backup them if desired). In order to be able to support you effectively and minimize setup issues and software conflicts, we require all students to install the software stack the same way.
In all the sections below, if you are presented with the choice to download either a 64-bit (also called x64) or a 32-bit (also called x86) version of the application always choose the 64-bit version.
Once you have completed these installation instructions, make sure to follow the post-installation notes at the end to check that all software is setup correctly.
Table of Contents#
UBC Student Email#
Please sign up for a UBC Student Email. This account will also grant you access to a range of other UBC services (not used in this course), including Microsoft Teams and OneDrive. To do so navigate to https://it.ubc.ca/services/email-voice-internet/ubc-student-email-service and follow the instructions under “Get Started”.
Web browser#
You are welcome to use most modern browsers that have a WebKit or Gecko backend. Safari, Firefox, Vivaldi, Brave, Edge are all recommended. Google Chrome is not recommended because of the well-documented privacy and tracking issues with Google.
Zoom#
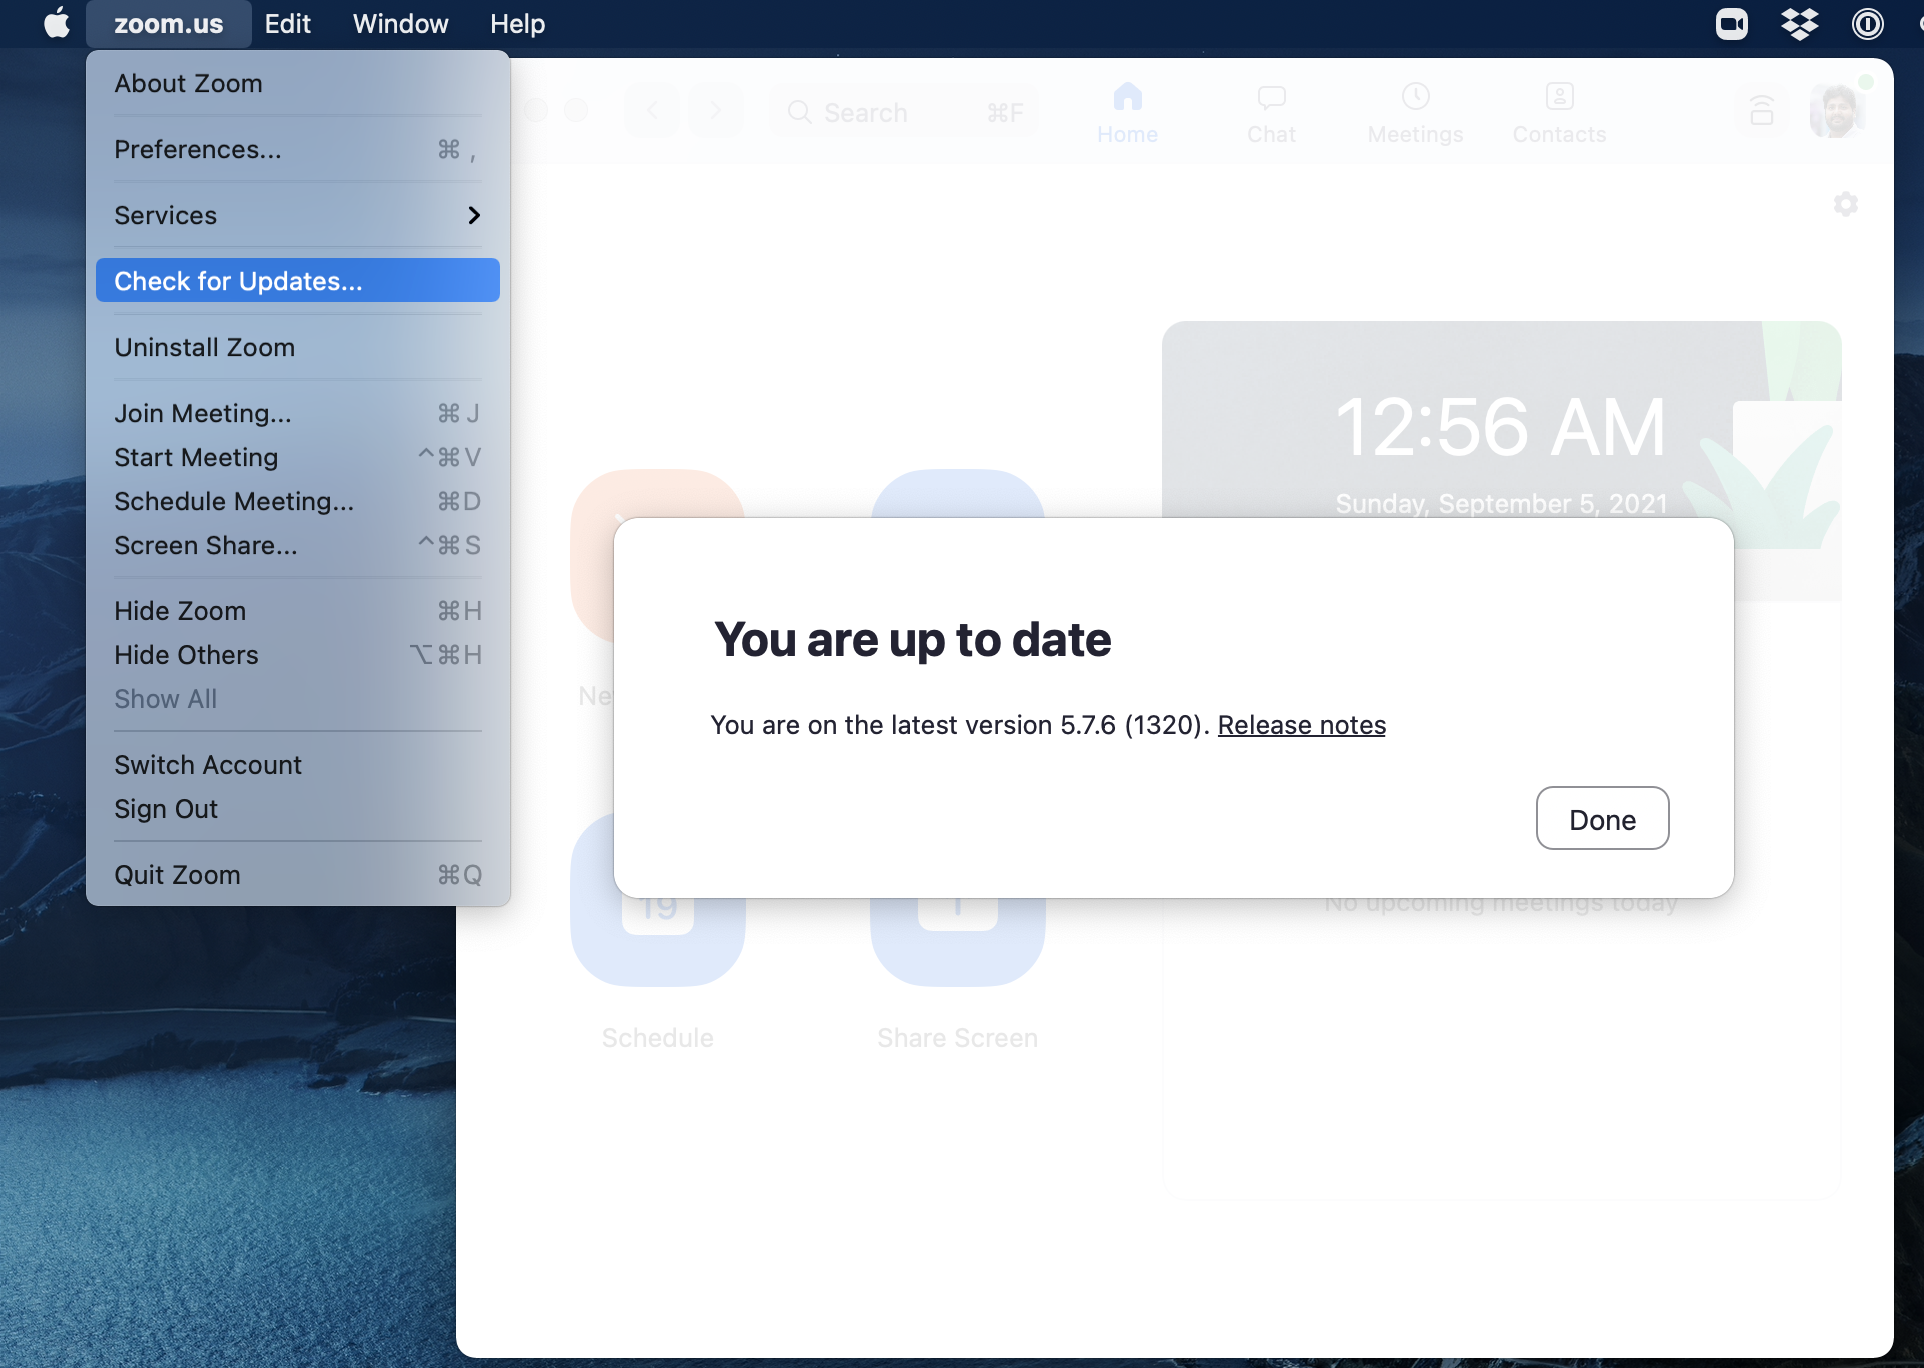
We will be using Zoom in this course for the classes, as well as the labs, and student hours. It is very important that you have the most recent version of Zoom installed, as we will be using many of the features that are only available in more recent versions.
The latest version of Zoom as of Sept 2022 is: 5.11.10 (102279).
You can ensure you have the latest version of Zoom by clicking “Check for Updates” as shown in the screenshot below.
Important
Please note that if you have been relying on the “web version” of Zoom that works only in a browser, this will not work for this course! Please make sure to download the Zoom desktop client for your operating system to fully participate in the course.
GitHub account#
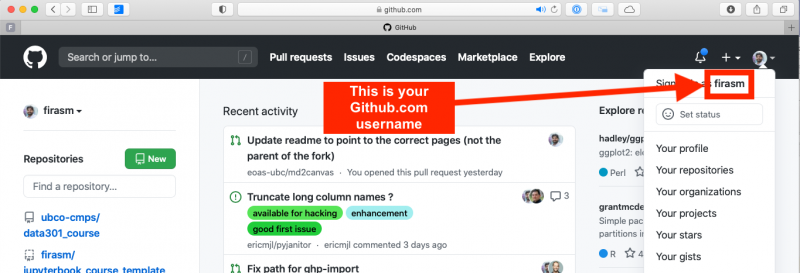
Sign up for a free account at GitHub.com if you don’t have one already. Your GitHub username is important, here’s how to find your username:
Microsoft Office#
UBC students have free access to a Microsoft Office 365 annual subscription, which is renewed for students enrolled in at least one course. Office 365 includes Word, Excel, PowerPoint, Outlook, and OneNote, and is available on a variety of platforms.
To get your free Office 365 license and download the installer files, visit UBC IT for the installation instructions. Note that you will need your CWL login credentials in order to download the software and activate your license from portal.office.com.
In this course, you will need Microsoft Excel.
Visual Studio Code#
The open-source text editor Visual Studio Code (VS Code) is both a powerful text editor and a full-blown Python IDE, which we will use for more complex analysis. You can download and install the macOS version of VS Code from the VS code website https://code.visualstudio.com/download. Once the download is finished, click “Open with Archive utility”, and move the extracted VS Code application from “Downloads” to “Applications”. Make sure you are able to open VS Code by clicking on the application.
VS Code extensions#
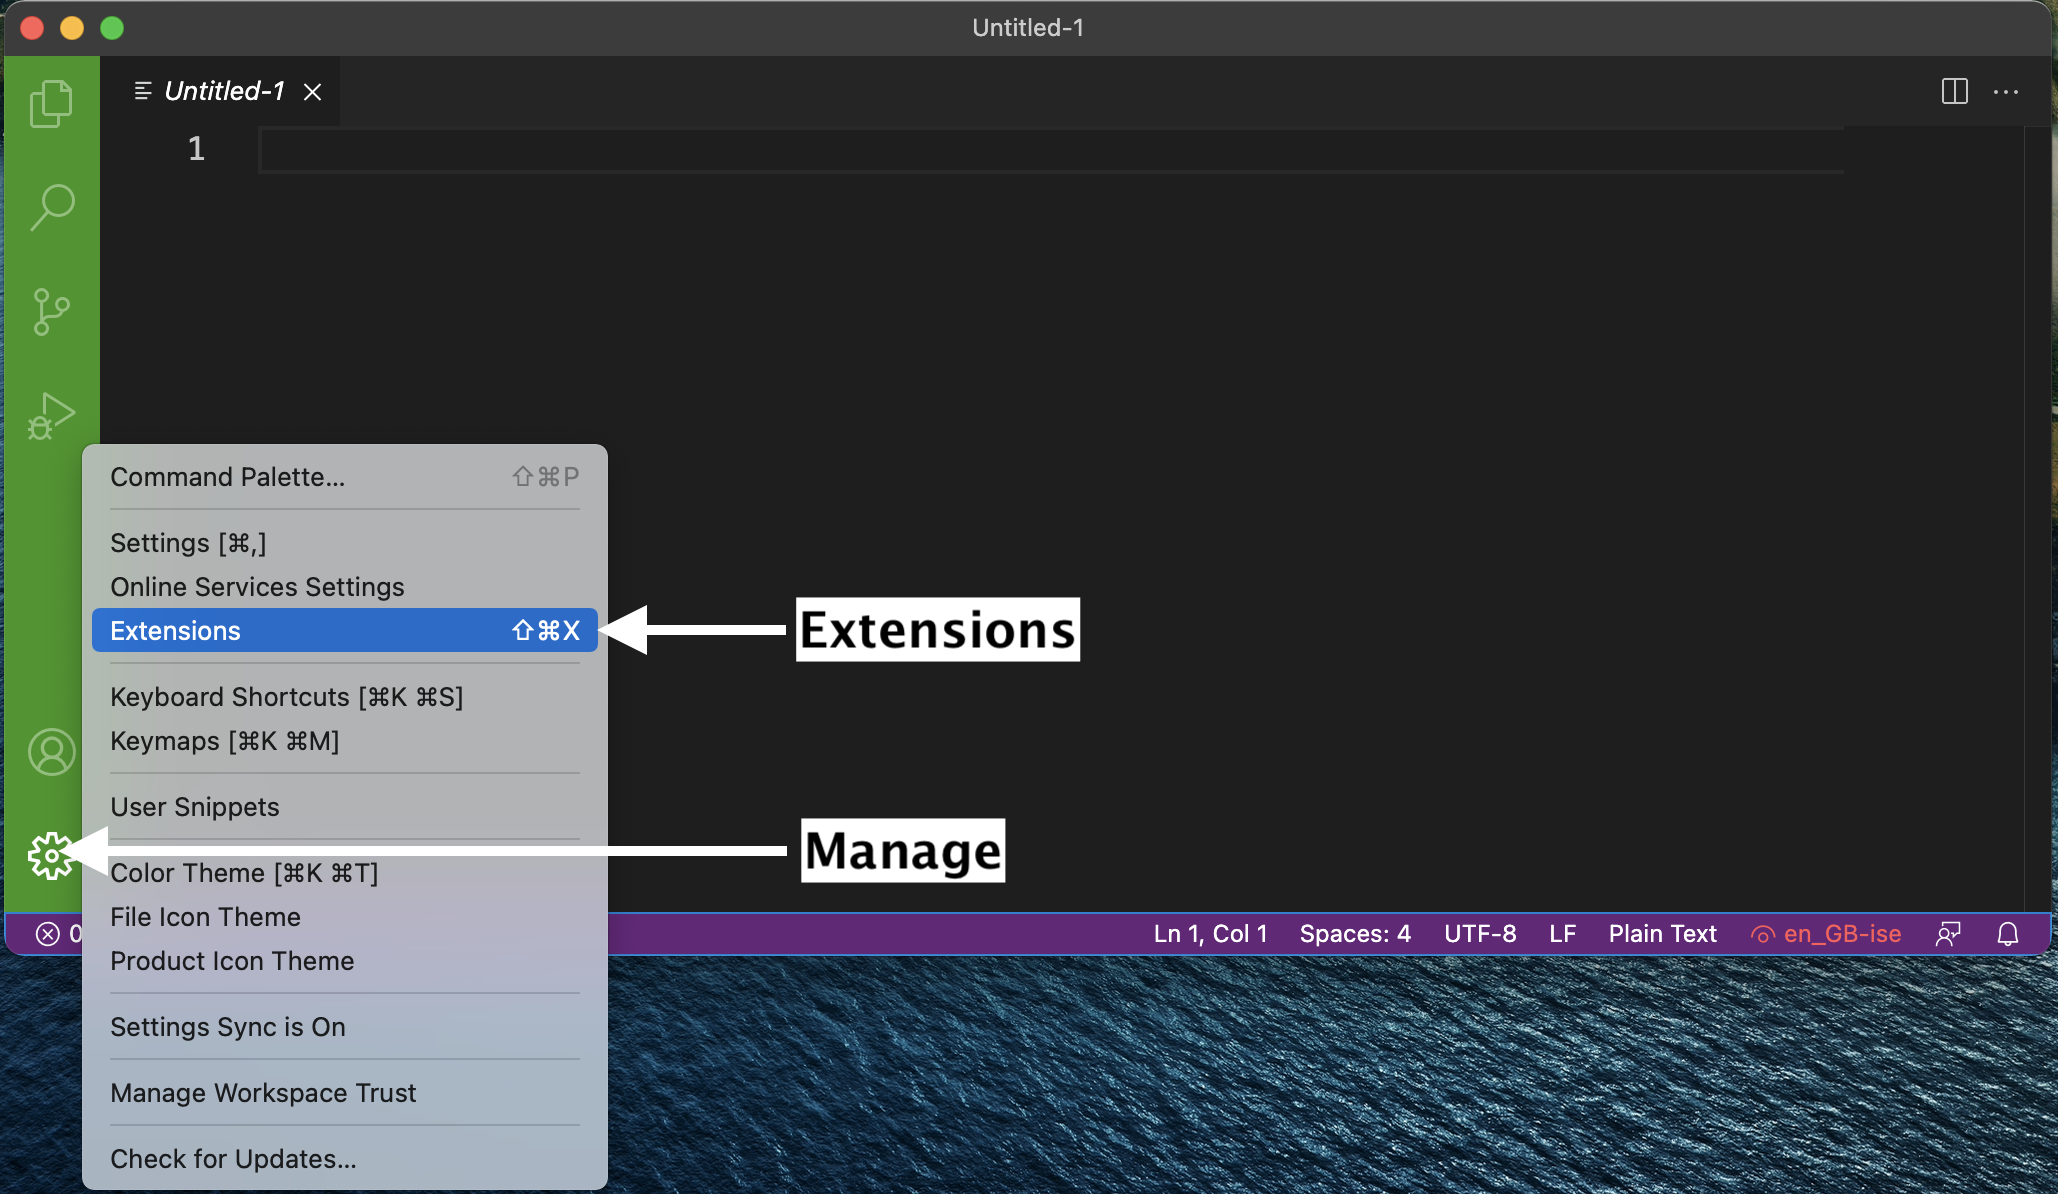
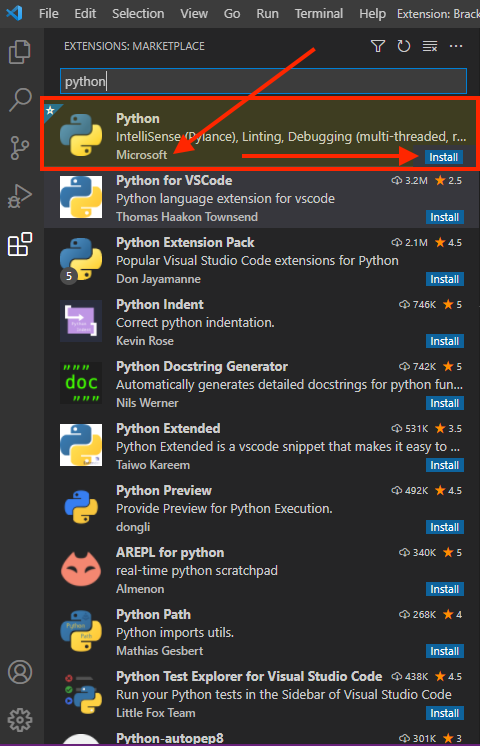
The real magic of VS Code is in the extensions that let you add languages, debuggers, and tools to your installation to support your specific workflow. Now that we have installed all our other Data Science tools, we can install the VS Code extensions that work really well with them. From within VS Code you can open up the Extension Marketplace (read more here) to browse and install extensions by clicking on the Extensions icon in the Activity Bar indicated in the figure below.
To install an extension, you simply search for it in the search bar, click the extension you want, and then click “Install”. There are extensions available to make almost any workflow or task you are interested in more efficient! Here we are interested in setting up VS Code as a Python IDE. To do this, search for and install the following extensions:
PythonPython Extension Pack(for notebooks, debugging, linting, formatting, etc.)markdownlint(markdown linting and style checking extension)
This video tutorial is an excellent introduction to using VS Code in Python.
Terminal#
Apple recently changed the Mac default shell in the Terminal to Zsh - though the reasons for this are complicated, it is a huge improvement over the out-dated Bash version that came pre-installed on macOS.
If you are already on macOS Monterey (macOS 12.5) or Big Sur (macOS 11.x), this change is already made for you. But if you are on Catalina (macOS 10.x), you should switch your shell.
To check which shell you are running, open a new Terminal (Applications-->Utilities-->Terminal or activate Spotlight and type in Terminal).
You will see a new window pop up and a blinking cursor.
Type in the following command:
echo $0
If you are running a bash shell, you will see the output as bash.
If you are running a zsh shell, you will see the output as -zsh.
To make sure your shell is set to zsh, run this command:
chsh -s $(which zsh)
You may be prompted for your macOS administrative user password.
Enter the password, quit the terminal (File-->Quit or Command+Q), and open it up again.
You should now proceed to do some more configuration via the Terminal.
Configure VS Code to launch from the Terminal#
Launch VS Code.
Open the Command Palette (⇧⌘P ; Shift+Command+P).
Type ‘shell command’ to find the “Shell Command: Install ‘code’ command in PATH” command.
Hit Enter
Restart the Terminal for the new $PATH value to take effect.
You can open files in VS Code from the Terminal!
Alternatively, just type code . in any folder to start editing files in that folder.
You can test that VS Code is installed and can be opened from Terminal by restarting Terminal and typing the following command in a Terminal:
code --version
you should see something like this if you were successful:
1.71
507ce72a4466fbb27b715c3722558bb15afa9f48
arm64 (or x64)
Manual install instructions are here, but remember you’re using the zsh now! steps as well.
Setting VS Code as the default editor#
To make programs run from the Terminal (such as git) use VS Code by default, we will modify ~/.z_profile. First, open it using VS Code:
code ~/.z_profile
Note
If you see any existing lines in your ~/.z_profile related to a previous Python or R installation, please remove these.
Paste the following lines to the new file that opens up:
# Set the default editor for programs launch from Terminal
EDITOR="code --wait"
VISUAL=$EDITOR  # Use the same value as for "EDITOR" in the line above
Then save the file and exit VS Code.
Most Terminal programs will read the
EDITORenvironmental variable when determining which editor to use, but some readVISUAL, so we’re setting both to the same value.
Python#
We will be using Python for a large part of the course, and conda will be our Python package manager.
We will be using the Miniconda installer (read more here) to install both python and conda at the same time.
Miniconda also provides us with a minimum number of useful packages so installation is quick, and relatively painless.
Installing conda and python#
The latest Miniconda installer can be downloaded from here: Miniconda macOSX 64-bit pkg install.
After installation, restart the terminal. If the installation was successful, you will see (base) prepending to your prompt string. To confirm that conda is working, you can ask it which version was installed:
conda --version
which should return something like this:
conda 4.12.0
Note
Note: If you see zsh: command not found: conda, try the following>: Open a new Terminal (it should be zsh), then type: source /Users/YOURUSERNAME/miniconda3/bin/activate OR source ~/miniconda3/bin/activate depending on whether you installed for all users, or just your user (make sure to also change YOURUSERNAME to your username). Then enter the following command conda init zsh. The error should now be fixed.
Next, type the following to ask for the version of Python:
python --version
which should return something like this:
Python 3.9.7
Note
Note: If instead you see Python 2.7.X you installed the wrong version. Uninstall the Miniconda you just installed (which usually lives in the /opt directory), and try the installation again, selecting Python 3.9 (or higher).
Essential Python packages#
conda installs Python packages from different online repositories which are called “channels”.
A package needs to go through thorough testing before it is included in the default channel, which is good for stability, but also means that new versions will be delayed and fewer packages are available overall.
There is a community-driven effort called the conda-forge (read more here), which provides more up-to-date packages.
To enable us to access the most recent versions of the Python packages we are going to use, we will add this channel.
To add the conda-forge channel type the following in a Terminal window:
conda config --add channels conda-forge
To install packages individually, we need to use the following command: conda install -c conda-forge "<package-name>".
The part about conda install tells the conda package manager to install a particular package, and the -c part is an extra “option” that tells conda to look in the conda-forge channel (which usually has the latest updated packages).
Let’s install the key packages needed (you will note that we’re also specifying certain versions of the package with = X.Y).
You should copy and paste each line below in your Terminal to install the following packages:
conda install -c conda-forge "jupyterlab=3.*"
conda install -c conda-forge "numpy=1.*"
conda install -c conda-forge "pandas=1.*"
conda install -c conda-forge "black=19.*"
conda install -c conda-forge "nbconvert=6.*"
conda install -c conda-forge "seaborn"
conda install -c conda-forge "pre-commit"
conda will show you the packages that will be downloaded, and you may need to press enter or Y (for yes) to proceed with the installation.
This may take a while to complete.
Git and GitHub#
We will use the publicly available GitHub.com.
You should already have your GitHub.com username, you will need that for this question.
Install Git on your computer#
We will be using the command line version of Git. Some of the Git commands we will use are only available since Git 2.23, so if your Git is older than this version, we ask you to update it using the Xcode command line tools (not all of Xcode), which includes Git.
Open Terminal and type the following command to install Xcode command line tools:
xcode-select --install
After installation, in Terminal type the following to ask for the version:
git --version
you should see something like this (does not have to be the exact same version) if you were successful:
git version 2.37.2
Note
If you run into trouble, this is the time to post on Ed Discussion with your error message and ask for help!
Configuring Git user info#
Next, we need to configure Git by telling it your name and email. To do this type the following into the Terminal (the same ones you used to sign up for GitHub):
git config --global user.name "YOUR NAME HERE"
git config --global user.email YOUR@EMAIL.com
Note
To ensure that you haven’t made a typo in any of the above, you can view your global Git configurations by either opening the configuration file in a text editor (e.g. via the command code ~/.gitconfig) or by typing git config --list --global.
Install Ohmyzsh to get Terminal colours, and highlighting#
Install Ohmyzsh to add Terminal colours, highlighting and other cool features.
Oh My Zsh is installed by running the following command in your Terminal:
sh -c "$(curl -fsSL https://raw.githubusercontent.com/ohmyzsh/ohmyzsh/master/tools/install.sh)"
You may now customize your Terminal with themes (see screenshots of themes here) by following the directions here. Selecting a theme is optional, the default one is pretty good as it is!
Create your GitHub “Personal Access Token”#
This is a bit tricky, so please make sure you follow these directions carefully.
Create a Personal Access Token on GitHub.com by clicking this link: settings/tokens; make sure to COPY the token that they give you, it is basically a special password that you can use in the Terminal. Detailed steps are:
Log in to GitHub.com,
Click your picture in the top right,
Click Settings,
Click Developer Settings
Click “Personal access tokens”, set the appropriate permissions at the “repo” level (see image below):
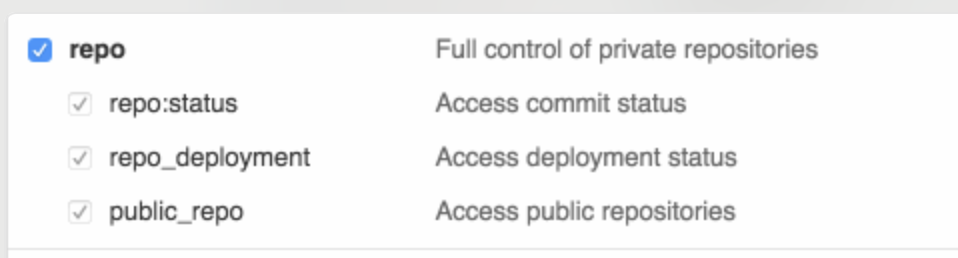
Fig. 4 Personal Access Token settings#

Click “Generate new token”
Save this token somewhere on your computer, you will need it when you clone a private repository to your computer.
Don’t share your token with anyone and protect it like it’s your password! You will not be able to come back to this page to get your token. If you forget it, or lose it, you can just delete the token and create another one.
Clone your first repository on your computer!#
Open a Terminal window, and then run the following command:
git clone https://github.com/firasm/test.git
Hopefully, if things work, you should be able to see a new folder created at that location. We will be talking more about what exactly you did over the next week and a bit, don’t worry!
Tip
If after running the code above, you see the error message:
fatal: destination path ‘test’ already exists and is not an empty directory.
It means that you already attempted a clone before, and there is already a directory called test where you are trying to clone this repository.
You will first need to delete that directory to try again.
Open an Explorer window on your computer, navigate to the directory, right click the test directory, and then delete the directory.
Alternatively, from the command line you can try:
rm -rf test
which will “remove” the directory called “test”. The “-” is to specify additional options: r means “recursively” for all the files in the directory, and f means “force” which means don’t ask me for confirmation after deleting each file and folder.
Tree#
“Tree is a recursive directory listing program that produces a depth indented listing of files.” This is very useful to explore your directory and file structure to figure out which files are where.
You can install the tree package using this command:
conda install -c conda-forge tree
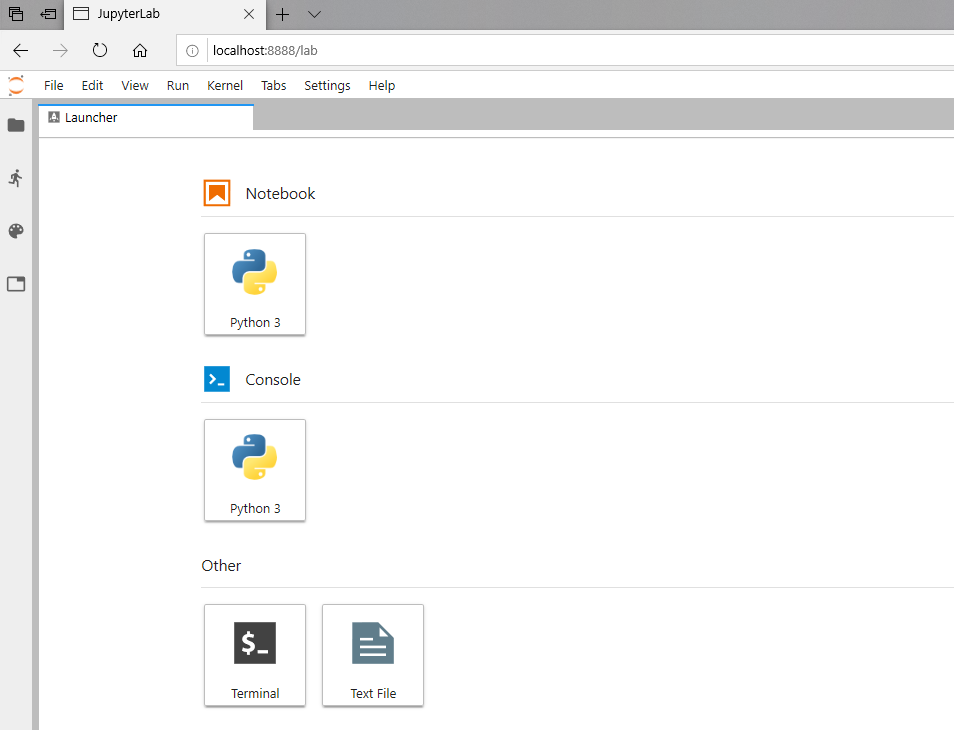
Test JupyterLab#
To test that your JupyterLab installation is functional, open a new Terminal window.
Then type jupyter lab and then hit enter.
This should open a new tab in your default browser with the JupyterLab interface.
To exit out of JupyterLab you can click File -> Shutdown,
or go to the terminal from which you launched JupyterLab and hold Ctrl while pressing c twice.
You should see something like this in your browser:
You’re all done!
Attributions#
UBC STAT 545 licensed under the CC BY-NC 3.0.
Important
These instructions have been adapted and remixed from the original version provided by the UBC-Vancouver MDS Install stack under a CC-BY-SA 4.0 license. They were originally written by Anmol Jawandha but have since been updated by Firas Moosvi, Joel Ostblom, Tomas Beuzen, Rodolfo Lourenzutti, & Tiffany Timbers, and others.